安裝了Akismet的AntiSpam功能

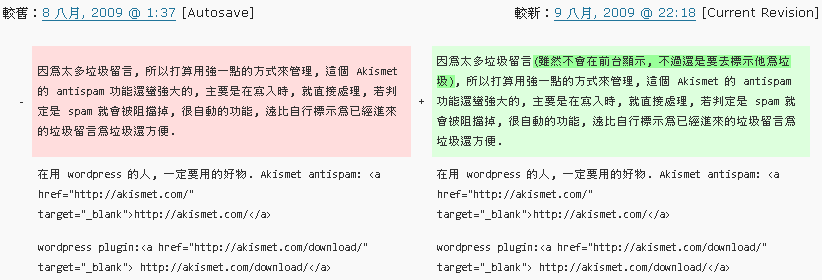
因為太多垃圾留言(雖然不會在前台顯示, 不過還是要去標示他為垃圾), 所以打算用強一點的方式來管理, 這個 Akismet 的 antispam 功能還蠻強大的, 主要是在寫入時, 就直接處理, 若判定是 spam 就會被阻擋掉, 很自動的功能, 遠比自行標示為已經進來的垃圾留言為垃圾還方便.

在用 wordpress 的人, 一定要用的好物. Akismet antispam: http://akismet.com/

wordpress plugin: http://akismet.com/download/

更新2.8.2

升上了2.7之後, 就有後台自動更新的功能, 不需要手動下載, 然後上傳等煩瑣的步驟來進行更新. 利用後台的自動更新, 將版本昇到 2.8.2 了, 並附上成功更新的畫面, 基本上, 真的是太人性化的設計了耶.

autoupdate282

不過其實更新前一樣都要先做好備份網站程式及資料庫的工作, 才不會發生問題時, 沒得補救哦.

wordpress2.8 release了

真是好消息, wordpress 2.8 release 了, 請參考: http://wordpress.org/development/2009/06/wordpress-28/ , 不過, 回到 http://mu.wordpress.com/ 時, 發現 mu 版本並未一併更新, 通常應該會遲一點, 不過可以先看看官方 blog 中的 wordpress 2.8 介紹, 先了解一下新增的功能.

屆時有 wordpress for mu 2.8 release 時, 再來進行升級更新, 不過其實目前的 wordpress for mu 我已經覺得很好用也很方便了, 期待它的新版本更新, 能修掉一些 bug 並強化更多功能.

查詢分割資料表的資料存放位置

由於資料量龐大, 為能改善效能, SQL Server 2005 增加了 Partition Table 功能將 table 依 partition function 來做分塊”橫切”的方式存放, 以將常用資料及不常用資料(如歷史訂單資料), 做實體的存放位置劃分, 讓它實際上是同一個表, 但在存放上是在不同的 filegroup 上, 如此一來, 便能有效將資料表做分塊(分區橫切)管理, 若是 partition function 切割有效的話, 對於查詢應用及備份應用應該會有非常大的幫助.

接下來, 我們需要了解的是實作完成後的 partition table 內, 各分區的資料存放筆數狀況, 可以利用兩個系統表來操作取得, 分別為:

  1. sys.partitions : (http://msdn.microsoft.com/zh-tw/library/ms175012.aspx)
  2. sys.dm_db_partition_stats: (http://msdn.microsoft.com/zh-tw/library/ms187737.aspx)

若是要取得某 table 名為 tblTest 這個 table 在各 partition table 中的存放筆數, 可以利用這個查詢:


SELECT ps.partition_number
,ps.row_count, ps.index_id
FROM sys.dm_db_partition_stats ps
INNER JOIN sys.partitions p
ON ps.partition_id = p.partition_id
AND p.[object_id] = OBJECT_ID('tblUsers')

這樣取得的結果, 一般若非 partition table, 會得到一筆資料, 例如:

d1

其中三個欄位說明如下:

  • partition_number: 指對應的資料分割編號(以1為基礎), 把他想成存放的分區代碼
  • row_count: 這個就是資料筆數
  • index_id: 這個很重要, 0為堆積, 1為clustered, 2以上為non-clustered

若是有無切分 partition table , 但又有多個 index 的 table 會得到如下結果:

d2

其中, 就是 1為clustered, 而9, 11, 12為 non-clustered 的資料.

再來就是看有切 partition table 的結果:

d3

這個案例來自於這篇文章: [SQL Server]如何將現有table調整為partition table (http://bbs.diary.tw/viewtopic.php?f=13&t=464)

其中, 可以清楚地看到 index_id 為0的, 是 partition_number 為1, 2, 3的資料存放筆數狀況, 而 index_id為2的是後來利用增加 primary key non-clustered index 的方式加入的索引, 得到總筆數的一個 index 存放狀況.

簡而言之, 資料存放的方式為 parititon1 放了 2筆, partitiona2放了 3筆, partition3放了4筆資料, 這樣的查詢結果對於要查目前的 partition table內存放資料的對應 parition 狀況應該就有很清楚的結果呈現了.

更新WPMU版本至2.7.1

這個網站原來是用 2.3.3 的版本, 但是因為版本到 2.7 之後的後台介面有長足的改善, 所以進行更新.

不過困難在於要由 1.3.3 (2.3.3) 更新到 1.5.1, 然後再升到 2.6 再升到 2.7.1, 真的很麻煩, 於是利用匯出匯入的方式, 重新安裝好 WPMU 2.7.1 之後, 再進行匯入完成.

陸續補上了 theme 及 pluglin 就完成了. 真的介面改善不少哦, 功能似乎也更強大了

SQL Server如何新增article到publication

在使用 Replication 時, 若是使用 Transaction 的方式, 若有要新增 article 到 publication 時, 其實很容易.

基本上就只要在原來的 publication 的 property 裡的 articles, 多加上需要 replication 出來的article, 完成後, 他不會自動進行後續, 接下來的動作就是做 snapshot 就行了, 這裡比較討厭的是若是原來的publication資料多, 而加入的 article資料少, 其實很不划算, 不過做完 snapshot 後, replication 機制會開始將該新發行的article schema傳給 subscriber, 讓 subscriber 將沒有的資料寫入, 這樣就完成了.

其實只會做新的部分, 不過因為還是要一個 schema及起始資料, 所以還是得做一個 snapshot 是比較吃資源的地方, 和 alter table的狀況又不太一樣了. 不過操作上還是很直覺也很方便!

參考SQL Server 2005 help 資料: http://msdn.microsoft.com/en-us/library/ms152493(SQL.90).aspx

其中比較重要的是這段:

After adding an article to a publication, you must create a new snapshot for the publication (and all partitions if it is a merge publication with parameterized filters). The Distribution Agent or Merge Agent then copies the schema and data for the new article to the Subscriber (it does not reinitialize the entire publication).

也就是說, 新增完了之後, 要做一次 snapshopt, 不過 agent 會將新的 article 送到 subscriber, 而不會整個 reinitialize!

SQL Server Replication下的異動資料表

若是SQL Server已設定完成Replication的Article時, 進行資料表異動, 其實會透過 DDL 傳送的方式, 將異動的指令也透過複寫的方式送出, 並進行同步. 可以參考相關文章: http://www.replicationanswers.com/AlterSchema2005.asp

不過若是異動的欄位是 Primary Key時, 將會觸發 exception, 發出如下的訊息:

Msg 4929, Level 16, State 1, Line 2
Cannot alter the table ‘tbltest’ because it is being published for replication.

如此一來便無法使用這種 ddl 傳遞的方式將 Replicated Table 的異動送出. 若是要執行這樣的異動需求, 得先解除掉發行及訂閱此 table, 才能進行調整, 調整完成後才能再重新設定回發行及訂閱, 接下來再做 snap shot 進行遞送出去.

如何讓IIS只佔用指定IP

在 IIS 中的站台設定, 可以明確地指定單一站台的 IP及 PORT, 不過無論如何設定, 預設 IIS 就會在發起 SERVICE 時, 佔用 0.0.0.0 這個 IP (也就是全部的 IP), 若是希望 IIS 不要佔用這個 IP (也就是希望能和其他佔用 80 PORT 的 SERVICE, 如 APACHE 共同使用同一台主機的狀況下), 可以利用 Support Tools 內的 httpcfg 工具來進行操作, 詳細步驟如下:

1. Click Start, and then click Run.
2. Type cmd, and then click OK to open a command prompt.
3. Type the following, where xxx.xxx.x.x is the IP address you want to add:

httpcfg set iplisten -i xxx.xxx.x.x
When this succeeds, Httpcfg returns the following:
HttpSetServiceConfiguration completed with 0To view additional status codes, see the Httpcfg help.

4. After the IP address is added, use the following command to list it:

httpcfg query iplisten
Httpcfg returns the following:
IP :xxx.xxx.x.x

5. From the command prompt, stop the HTTP service and its dependent services. To do this, type the following string at the command prompt:

net stop http /y

6. From the command prompt, restart the HTTP service and it dependent services. To do this, type the following string at the command prompt:

net start w3svc
Note When you start w3svc, all services that were stopped when HTTP was stopped will start.

進行指定 IP 的操作後, 之後 IIS 就只會佔用指定的 IP, 而不會佔用全部的預設 IP 0.0.0.0 囉! 請參考微軟 KB 資料: http://support.microsoft.com/kb/813368

SQL Server釋放記憶體方式

若是 SQL Server 2005有突發性的記憶體不足的問題, 可能是一個 bug, 可以參考: http://support.microsoft.com/kb/912439 , 也有可能是記憶體配置的問題, 不過無論如何, 很有可能造成系統的重大負擔而其他服務或 terminal service無法工作, 有個比較快速的解決方式是先清除 server 內的記憶體快取的部分, 可以使用以下幾個指令來處理:

  1. DBCC FREESYSTEMCACHE : 可以參考: http://msdn.microsoft.com/en-us/library/ms178529.aspx
  2. DBCC FREESESSIONCACHE: 可以參考: http://msdn.microsoft.com/en-us/library/ms187781.aspx
  3. DBCC FREEPROCCACHE: 可以參考: http://msdn.microsoft.com/en-us/library/ms174283.aspx

這樣可以快速地爭取到一些 SQL Server釋放出來的記憶體, 並登入 SQL Server 主機進行操作或 reboot, 以降低對系統的傷害.

通常會發生這樣的狀況, 有些是因為記憶配置的問題, 也有 svchost.exe 在網路上使用過量的記憶體等狀況, 但無論如何, 能先爭取登入主機並進行一些急救處理, 以整理或釐清問題所在是相當重要的.

ps. 若要都用預設釋放的指令如下:

DBCC FREESYSTEMCACHE(‘ALL’)
DBCC FREESESSIONCACHE
DBCC FREEPROCCACHE WITH NO_INFOMSGS

可以很快地救急.

真是不錯的SyntaxHighlighter-Plus

之前一直在找可以在 wordpress mu 版本下可用的 syntax highlighter, 試了許多都沒辦法很順利的使用, 到昨天找到了一個算可以用的版本, SyntaxHighlighter-Plus (連結). 怎麼說算可以用呢? 主要是因為他的目錄命名會和 wordpress mu內的urlrewrite 會有一些衝突, 因為他的目錄也有用到 “files” 這個關鍵字, 解決方式很簡單, 就是將 syntaxhighlighter-plus目錄內的 files 目錄改名, 並配合調整一下即可, 我將原來的 source 改了一下, 放到這裡來方便 wordpress mu 的用戶來安裝! SyntaxHighlighter-Plus for wordpress mu

使用方式原作者的說明很詳細了, 就是解壓安裝至 plugins 目錄後, 到後台啟用, 再於撰寫文章時, 切換至 “code”模式下(主要是避免 < > 角括號(小於, 大於符號會被 wordpress 編輯器改寫為 < 及 >), 使用[sourcecode language=’xxx’]程式碼[/sourcecode]的方式將程式碼包住就可以達到語法高亮的效果, 範例如下:

// default display_errors value is on
ini_set('display_errors', Off);
$display_errors = ini_get('display_errors');
echo "display_errors=$display_errors<br />";
echo "1/0<br />";
$a = 1/0;  // nothing happened.
ini_restore('display_errors');
echo "1/0<br />";
$a = 1/0;

要特別注意的是即使第一次使用了 “code” 編輯模式存檔, 再編輯時, wordpress 編輯器仍會再做 > < 的轉碼, 這個是很討厭的一個麻煩問題.

這套程式一樣基於 dp.SyntaxHighlighter 的程式碼開發, 看了一下 for wordpress 的這個版本, plugin 的作者很貼心的設計了多組參數來簡化輸入, 如下:
* `〔source language=’css’〕code here〔/source〕`
* `〔code language=’css’〕code here〔/code〕`
* `〔sourcecode lang=’css’〕code here〔/sourcecode〕`
* `〔source lang=’css’〕code here〔/source〕`
* `〔code lang=’css’〕code here〔/code〕`
* `〔sourcecode=’css’〕code here〔/sourcecode〕`
* `〔source=’css’〕code here〔/source〕`
* `〔code=’css’〕code here〔/code〕`
* `〔lang=’css’〕code here〔/lang〕`
* `〔css〕code here〔/css〕` (or any of the supported language)
(為避免衝碼, 已經上面的半型方括號改為全形的)

另外還有他會針對該文章內使用的 sourcecode language的不同來進行 dp.SyntanHighlighter 的 js 載入, 例如只有 php 程式碼, 他就只載入 shBrushPhp.js , 當然 shCore.js 是一定都會載入的啦, 這樣的好處就可以節省了一些引入的 javascript 的 js 檔, 也相對比較快. 給各位參考!